Showing posts with label recipe. Show all posts

Sunday, October 16, 2016

The Go-To

I love having go-to's. No fuss, no muss, no question. Little by little, I add to my collection of recipe go-to's -- the best have simple ingredients and simple steps. This is one that's been a standby for years now! 

The olive wood rolling pin was a gift from my husband, straight from Greece --
I love the amazing grain!
.
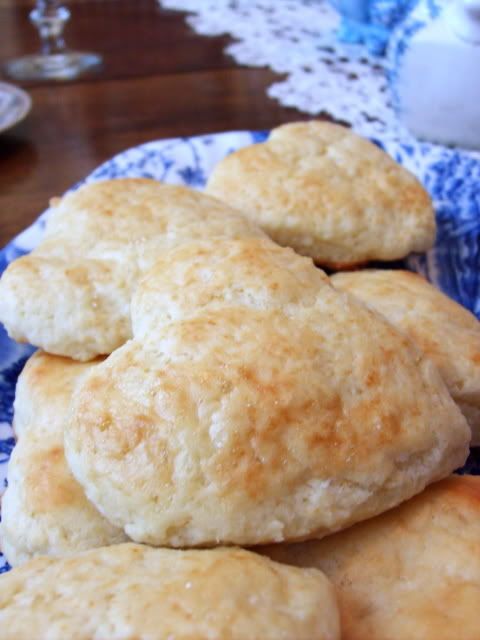
Because who doesn't need a go-to recipe for scones? A never-fail, always delicious, always gone too soon recipe. It's superb plain, but it's also the perfect canvas for mix-ins (craisins, dried oranges, walnuts, pecans, chocolate...). These are cranberry-walnut. Or were, rather. They didn't last very long...


This recipe came from the sensibility.com message forums -- from none other than the marvelous Suzi Clarke!

Suzi’s Scones


Ingredients:
  • 1 ¼ cups all-purpose flour (Sometimes I use whole wheat pastry flour, but they're fluffiest with all purpose)
  • 1 ½ tsp baking powder
  • ½ tsp. salt
  • 3 TBSP sugar 
  • 1 ½ oz./3 TBSP butter 
  • 1/3-1/2 cup sour milk or buttermilk, or milk curdled with lemon juice. 

Directions:
  1. Whisk the dry ingredients together. 
  2. Cut the butter in until mixture looks like breadcrumbs.
  3. Stir in the milk, very gradually, to make a firm, pliable dough. Don't let it get too sticky.
  4. Roll out in a circle on a floured board to about 1/2" thick. Cut into 8 wedges. Place on an ungreased baking sheet. Put in a hot oven, 400-425 degrees, for about 10 minutes.

Hope one of my favorite go-to's may end up being one of yours, too!

Tuesday, January 06, 2015

Winter Eats -- Leek, Potato, and Ham Soup

I've been longing to try a leek and potato soup since... well, it's been a long time. The simplest way to go about this is to purchase both leeks and potatoes at the store, along with any necessary seasonings. But having never to my knowledge purchased a leek (or even held one), I gave in to my fear of the unknown. Which is a shame, because my husband declares that this is his second favorite soup -- our homemade version of Panera's broccoli cheese soup is forever his favorite, so second best is fine with me!


I used this recipe as a base, but beefed it up a little. Well, "hammed it up" would be more accurate, since I used leftover Christmas ham -- my husband does not eat vegetarian dinners! Really, any meat would do (though I think ham has the best kind of flavor for this soup), or it could be omitted altogether. I'll provide ingredients and instructions below, but this is a super easy and super flexible recipe that could be altered to your tastes or ingredients.

Leek, Potato, and Ham Soup

Ingredients:
  • 2-3 leeks, diced (about 1/4" 'squares' -- I used quite a bit of the dark green stem, too)
  • 4-5 medium potatoes, diced 
  • 2+ TBSP of butter 
  • 4 cups of broth (chicken, vegetable, etc.)
  • Seasonings to taste (rosemary, thyme, sage, salt, pepper, minced garlic)
  • 2-3 cups of ham, diced (or another meat; optional)
  • Toppings (oyster crackers, bacon, and shredded cheddar are amazing!)


Instructions:

  1. Melt a few tablespoons of butter in a large pot and add the leeks and potatoes. Saute until the leeks are soft, adding more butter if needed. When this step was almost done, I threw in some fresh rosemary, sage, and thyme, along with a bit of minced garlic, some freshly ground pepper, and a pinch of salt. Use your imagination!
  2. Add the broth and bring to a boil; I used rabbit/chicken broth supplied by friends from church (They raise their own meat rabbits! How cool is that?), which is amazing. Reduce heat and simmer for twenty minutes, or until potatoes are tender. I threw a piece of ham bone in while it simmered, for additional goodness.
  3. Put about half of your soup -- or all of it, if you prefer -- into a blender or food processor (be careful doing this with hot liquid! Either wait for it to cool, or make sure your appliance is well vented to avoid explosions). Pulse until delicious, then add back to the rest of the soup. I actually used two "fresh" potatoes because that was all I had, and added in two cups of leftover mashed potatoes during the blending stage. I worked out just fine!
  4. Add the diced ham, if desired.
  5. Serve topped with cheddar, bacon, and crackers, with a side of buttered, toasted bread. And a salad, if you're feeling extra healthy.


Bon appetit!


Thursday, October 09, 2014

Homely

We've been enjoying homely things of late -- "homely" in the English sense, that is. I've never understood the American usage as a description of plain features. Isn't home supposed to be beautiful, anyway? But that's neither here nor there. 

We finally found a fool-proof bread recipe that works for us -- with only a few ingredients, it's a keeper. There's something so validating about making bread. Perhaps because I've never been very successful in the past? At any rate, this bread is delicious and satisfying spread with some of the local wildflower honey we just bought.


Though nothing can satisfy like the Bread:


"Jesus said to them, "I am the bread of life; 
whoever comes to Me shall not hunger, 
and whoever believes in Me shall never thirst. 
All that the Father gives Me shall come to me, 
and whoever comes to Me I will never cast out."

John 6:35, 37

Edited to include the recipe, as requested!

The recipe we use is strongly based on Jamie Oliver's bread recipe (video here, slightly different written recipe here). But we've made a few alterations -- or just mixed the two recipes -- until we found what works for us.

I mix everything up in my KitchenAid with the dough hook. My food processor works, but if I do more than half a recipe it gets gummy dough all over everything! Plus, my mixer is easier to clean.

OUR VERSION: 

Ingredients:
  • 1 kg flour -- I do half whole-wheat pastry flour, and half all purpose or bread flour (I put my mixer bowl on our digital scale, set it to 0.0, and then pour flour in until I reach a kilo)
  • 4 1/2 tsp yeast (2 packets)
  • 2 tsp salt 
  • ~3 cups of hot water (I use less and add a bit more if needed; I like the dough to not be too sticky, but it seems to turn out better if it's "moist")
  • 2 TBSP of olive oil (I think this is technically for pizza crust, but it works & I'm not changing it!)
  • Generous squirt of honey -- probably 2 -3 TBSP
Directions:
  1. I mix everything in our KitchenAid with a dough hook until everything is combined. I toss in a bit of extra flour and give it a couple of good "kneads" in the bowl, cover it with plastic wrap, and put it on the stove under the light to rise. 
  2. After about an hour the dough has doubled in size. I knead it more thoroughly on a floured surface, probably 2 minutes or so. Then I divide it in half, shape it (roughly), and place it in two oiled bread pans. It goes back on the stove covered with a tea towel. My oven takes about 15 minutes to preheat to 375 degrees, so I usually just start the preheat now.
  3. In roughly 20 minutes the dough has risen in the pans. I make several diagonal cuts on the top of each loaf with a knife (optional) and stick it in the 375 degree oven for 35 minutes. 
  4. When the bread is done I put the pans on cooling racks, then remove the bread (a table knife will loosen the sides if needed) a few minues later. Leaving it in the pans too long will cause it to go soggy. Also, I've heard you should allow it to cool completely before cutting -- we don't always do that... *wink* But put it back on the cooling rack after cutting, to avoid sogginess. 
And that's that! I've seen and tried other recipes, but most either didn't work well for anything other than thick slices of toast (I wanted a good sandwich bread!) or had so many ingredients that bread making would be a chore (and sometimes an expensive one, if milk or copious amounts of honey were involved!). That's why I love this recipe -- it's so ridiculously simple, uses whole ingredients (why are they putting cellulose in bread products now?), and is very forgiving. Seriously, I forget about it sometimes when it's rising, and we've yet to have a failed loaf! Oh, and it's not frustratingly sticky like many of the recipes I've tried.  I did leave out the oil accidentally last time, and the bread is drier and not as delectable, so I'd recommend leaving it in. 

Enjoy!


UPDATE 11/18/14: I've edited the recipe to shorten the baking time -- I reduced the time while making stromboli (which this dough is EXCELLENT for, by the way! I used half of the dough for stromboli and made a loaf of bread with the other half), and realized that the bread was softer and less crumbly while still fully cooked. 

Also, I just tried using this dough for rolls and a boule (both of which I placed on a baking tray covered with parchment paper), and they came out beautifully. Obviously, reduce the time for rolls -- 20 minutes at 375 was the magic number for us.

Monday, July 29, 2013

Guilt-Free Summertime

When the summer heat gets intense (and in Florida, when is it ever not intense?), I find myself craving something cold. And something sweet -- but that's not really limited to summer! However, I don't want to indulge in refined sugars too often.

Banana ice cream to the rescue! It has the consistency of soft serve, it's sweet and creamy, and it has only two ingredients -- neither of which are sugar. Yes, I realize that bananas are sugary fruits, but I really don't mind that.

I've been raving about it to friends and family, but they've all seemed unimpressed -- until they try it! Little Man asks for it frequently, and I love having a nutritious "treat" to serve him. Even Rosa has seemed pleased with the little nibbles she's gotten (when I'm feeling generous enough to share with her!). 


Fresh banana ice cream topped with cream and sprinkles --


You can find various versions of this on the web, but here's how I do it:

Ingredients:
  • Bananas
  • Milk

Insructions:
  1. Cut a ripe banana into slices and lay on a baking sheet (I line mine with wax paper for easy cleanup).
  2. Pop into the freezer for a few hours -- they store well for several weeks, so there's no need to use them right away (though I'd recommend transferring them to a closed container if you plan to store them)
  3. Place banana "coins" into a food processor (or blender) and add a dash of milk -- we use whole raw milk, but any milk should do. You might even be able to use water if you need it to be dairy free, but I'm not sure what that would do to the consistency and taste.
  4. Pulse your food processor until the banana starts to break up. Add more milk as needed until the consistency is smooth and creamy. Adding too much milk will make it soupy, though, so be conservative!
  5. Serve with desired toppings. I usually add just a dash of Reddi Whip and a few jimmies (yes, I realize that both of those contain sugar! *wink*), but I've also tried chocolate chips, pecans, shredded coconut -- the sky's the limit!

Notes:
  • The texture is quite thick, so I use my food processor -- I've done it in a blender, but it involved lots of stopping to smash banana chunks down into the blade area.  
  • You could combine other fruits with the banana if you want to add other flavors -- strawberries and raspberries are both good candidates, but I wouldn't recommend watery fruits like watermelon or citrus.

Monday, June 03, 2013

Key Lime Bars

Lime is one of my new loves -- citrusy, summery, and a tad sweeter than lemon. 

A leftover lime from a homemade sugar scrub inspired me to try a lime bar recipe from my recipe binder. It was a Land o' Lakes recipe snipped from a flyer or magazine ages ago. But after trying the recipe, it's been transcribed and printed in a more readable, permanent format. Because these are keepers:


Fresh, sweet, and deliciously chilled. A perfect summer dessert!

These babies are NOT gluten free, Paleo friendly, low in sugar, or remotely healthy. Which is probably why they taste so good. *wink* Actually, I don't think it would be too difficult to make them gluten free, and if you substituted something healthy for the refined sugar, you could probably come up with something that won't double your blood sugar levels in one bite. But I'll leave that to your discretion, because I like these sugary little confections just the way they are.


Key Lime Bars

Ingredients:

Crust:
  • 1 ¼ C all-purpose flour 
  • ½ C Butter, softened 
  • ¼ C sugar 
  • ¼ C chopped pecans 

Filling: 
  • ¾ C sugar 
  • 2 eggs 
  • 2 TBSP all-purpose flour 
  • 3 TBSP key lime juice (I used regular lime)
  • ¼ tsp baking powder

Frosting:
  • 1 ½ C powdered sugar 
  • 1 TBSP butter, softened 
  • 1 to 2 TBSP key lime juice 
  • Freshly grated key lime peel 

Directions:
  1. Preheat oven to 350˚ 
  2. Combine all crust ingredients except pecans in small bowl. Beat at low speed, scraping bowl often, until mixture resembles coarse crumbs (I used my food processor). Stir in pecans. Press onto bottom of ungreased 8 or 9-inch square baking pan. Bake for 15 to 20 minutes or until edges are lightly browned. 
  3. Meanwhile, combine all filling ingredients in small bowl. Beat at low speed until well mixed. Pour filling over hot, partially baked crust. Continue baking for 18 to 20 minutes or until filling is set. Cool completely. 
  4. Combine all frosting ingredients except lime peel in small bowl. Spread over cooled bars. Garnish with grated lime peel. Store refrigerated.

Thursday, May 31, 2012

Whoopie Pies


Every once in a while it's my turn to provide snack for our small group Bible study. For me, this is always a fun opportunity to do a little baking, since I'm rarely willing to venture time-consuming baking projects. That, and with only two adults in the house, a little sugar goes a long way. 

This time, I thought Whoopie Pies were in order. I still remember when my family moved to Pennsylvania, when I was about seven years old. One of the ladies in our church gave us a basket filled with individually plastic-wrapped Whoopie Pies. I had never tried one before, but one bite and I was hooked. 


Fast forward sixteen years, and Whoopie Pies still make my favorite desserts list. Granted, it's a long list! *wink* Apparently they're becoming more mainstream, as I recently saw a whole cookbook of Whoopie Pie recipes at Barnes and Noble a few months back.

At any rate, I was quite satisfied with the results of my recent attempt. For the cakes I used the Real Maine Whoopie Pies recipe from Katy Elliott's blog, which I ended up tripling. However, I opted for the Food Network Whoopie Pie recipe for the filling, and I'm glad I did. Mostly because the Food Network recipe uses a whole jar of Marshmallow fluff, rather than the 2 TBSP called for in the first recipe. And more marshmallow fluff is a good thing. A really good thing. I did add extra confectioner's sugar, milk, and vanilla, since I was making a rather large batch. I just eyed the consistency, and it turned out perfect. Oh, that filling! I've officially decided to add Marshmallow fluff to any buttercream icing I make from now on.

Apparently, there's a huge argument over whether Whoopie Pies originated in Maine or in Lancaster County, Pennsylvania. But as far as I'm concerned, the origin is insignificant. All I'm concerned with is the chocolate marshmallowy goodness.


Tuesday, July 06, 2010

Natal Day Celebrations


June was Pablo's birthday month, and we celebrated with a quiet supper at home.


On the menu? His favorite, Broccoli Cheese Soup.


The recipe is modified from the Panera recipe, and I can't say that I've ever tasted a better version of this soup!


**********************************

~ Broccoli Cheese Soup ~

Serves 4

- 1 TBSP melted butter
- 1/2 medium chopped onion
- 1/4 C melted butter
- 1/4 C flour
- 2 C half-and-half
- 2 C chicken stock
- 1/2 lb. fresh broccoli (cut the florets into bite sized pieces; grate the stalk)
- 1 C matchstick carrots
- 8 oz grated sharp cheddar cheese (Pablo says 8 ounces is the minimum!)
- 1/4 tsp nutmeg
- Salt and Pepper

1. Saute onion in butter. Set aside.

2. Cook melted butter and flour using a whisk over medium heat for 3-5 minutes. Stir constantly and add half-and-half

3. Add the chicken stock. Simmer for 20 minutes.

4. Add the broccoli, carrots, and onions. Cook over low heat 20-25 minutes, stirring occasionally.

5. Add cheese, stirring until melted. Stir in nutmeg. Salt and pepper to taste.

**********************************

And no birthday would be complete without dessert!


Pablo's dessert of choice is apple pie a la mode -- this time I discovered that cooking the apples beforehand makes for a much softer and juicier filling.


Many Happy Returns of the Day to the best of husbands, and the best of friends!

Thursday, January 28, 2010

Easy Pasta Dinner


One of the perks of married life is having my own kitchen! I have the sweetest little "postage stamp" kitchen, which is big on efficiency if not on space. *wink* With just two of us there's little sense in running the dishwasher (and I like washing dishes anyway), so instead we use it to store our Pyrex. So much handier that having to stack it in a cupboard.

But that's beside the point. Because the point of this post is an easy pasta dinner. This is recipe I came up with while figuring out what to serve at a mystery dinner. It's quite easy, and very flexible!


~ Easy Alfredo Pasta Bake

- 1/2 box pasta (I used the little shells), which is 4 servings
- 1/2 medium-size jar of Alfredo sauce
- 1/4 cup milk
- plenty of Italian seasoning
- dash of pepper
- garlic powder to taste
- 1/4 of a large red onion
- 1 clove of garlic
- Shredded Mozzarella cheese
- Bread crumbs


1. Cook pasta according to directions on box.

2. Meanwhile, combine Alfredo sauce and milk in a small saucepan over medium heat. Add Italian seasoning, pepper, and garlic powder to taste (Alfredo sauce in a jar is shockingly bland!). Stir occasionally.

3. Slice onion into quarter rings. Dice garlic clove. Saute onion and garlic in a skillet with some butter over medium heat, until onions are limp and slightly browned.

4. Preheat oven to 375 degrees. As soon as the pasta is done, combine all of your ingredients in a baking dish, mixing them together well. Generously sprinkle the shredded mozzarella and the bread crumbs on the top.

5. Pop it into the oven for 10-20 minutes (or until the top looks slightly browned and the cheese has melted.


Serve with garlic bread...


...and a Caesar Salad.


This served two very hungry adults, with enough left over for Pablo's lunch. If you served it with a meat (grilled chicken would be great!), it should serve 4-6. All of the ingredients are flexible with regard to amount; this is just a "do what feels right" kind of recipe. I love it because you can make it very complex (make your own Alfredo sauce, grow your own onions, make your own pasta!), or very simple (canned Alfredo sauce, etc.).

And it has Pablo's seal of approval, to boot!

Saturday, November 01, 2008

Festive Fall Dinner


My sister, Tiffany, and I decided to make a "fancy" dinner tonight, inspired by the butternut squash sitting on our counter at home and the reduced sourdough loaves we found at the grocery store -- the perfect size to use as bread bowls.


Butternut Squash and Carrot Soup ~ 3 c. peeled, diced butternut squash (about 1 small squash) ~ 2 c. thinly sliced carrot (4 medium) ~ 3/4 c. thinly sliced leek or chopped onion ~ 1 T. butter or margarine ~ 28 oz. chicken broth ~ 1/4 t. ground white pepper ~ 1/4 t. ground nutmeg ~ 1/4 c. light cream Garnish options: ~ Dairy sour cream ~ Toasted pumpkin seeds ~ Fresh tarragon sprigs Instructions: 1. In a large covered saucepan cook squash, carrot, and leek in hot butter over medium heat about 8 minutes, stirring occasionally. Add broth. Bring to a boil; reduce heat. Simmer covered for 25 to 35 minutes, or until vegetables are very tender. Cool slightly. 2. Place one-third of the squash mixture in a food processor or blender. Cover and blend until almost smooth. Repeat with remaining squash mixture. Return all of mxiture to saucepan. Add white pepper and nutmeg; bring just to boiling. Add light cream; heat through. If desired, garnish each serving with sour cream, pumpkin seeds, and/or fresh tarragon.


This creamy orange soup is absolutely delicious, and a perfect Autumn dish. Just the thing to take the edge off these crisp Autumn days!

Friday, June 06, 2008

The Recipe


When my dad first tasted a friend's pound cake a few years ago, he begged her for the recipe. She very kindly obliged, and wrote out the recipe (which had been passed down from her grandmother) in beautiful scripted handwriting. It was labeled, simply, "The Recipe."


My dad requested one this week so that he could share it with his fellow teachers at his school. And, should you ever be in need of a tried-and-tested pound cake recipe, I'll share it here:

~ 3 cups sugar
~ 1 cup Crisco (not thrilled about this, but this cake is worth it!)
~ 1/4 lb. real butter
~ 5 eggs
~ 3 cups cake flour
~ 1/2 cup regular flour
~ 1/2 tsp. salt
~ 1/2 tsp. baking powder
~ 1 cup milk
~ 2 tsp. real vanilla extract

1. Cream sugar with Crisco and butter; add eggs one at a time, beating after each addition.

2. Sift together flour, salt, and baking powder. Add flour mixture to creamed mixture, alternating with milk. Add vanilla.

3. Pour into greased and floured tube pan. Start in COLD OVERN and bake 1 1/2 hours at 325 degrees.

4. Let cool ten minutes and then turn over on to serving plate. Wrap with plastic wrap to keep in moisture.


I couldn't believe how perfectly this cake came out -- I love tube pans with releasable bottoms! And the cake itself was dreamy; moist, delicious, and beautifully golden.

We opted to pre-slice the cake and arrange it on my mother's vintage cake plate. Much more glamorous than plastic wrap, don't you think?


(Just in case you couldn't figure out what was under the dome...)

Sunday, May 11, 2008

A Mother's Day Tea


While my mother doesn't usually request anything special for Mother's Day, my sister and I decided to host an impromptu tea party for her this year.

What's a tea party without scones? I made a half recipe, and very carefully remembered to cut every ingredient in half -- except the butter! They still worked, and were quite delicious.


~~~

Sweet Vanilla Scones (taken from If Teacups Could Talk by Emilie Barnes):

2 cups all-purpose flour
1/2 tsp salt
4 TBSP sugar
1 TBSP baking powder
3 1/2 TBSP butter
1 8-oz. carton vanilla yogurt
2 eggs, separated
3 TBSP heavy cream

1. Preheat the oven to 425 degrees.

2. Stir together flour, salt, sugar, and baking powder. Using a pastry blender, cut butter into flour mixture until it resembles coars crumbs.

3. Stir together the vanilla yogurt and the egg yolks. add to the flour mixture and stir lightly with a fork. Add cream 1 tablespoon at a time until dough begins to clump together.

4. Gather dough on lightly floured surface and knead just three or four times or until the dough holds together (Do not overwork!). Pat dough into a rectangle about 3/4 inch thick and cut with 2-inch round cookie cutter.

5. Place scones on ungreased cookie sheet and brush tops with beaten egg whites. Bake for 10 minutes or until ight brown. Serve warm. Makes approximately 16 scones.

~~~

Although they're good enough to eat alone, we served the scones with lemon curd and fresh whipped cream:


I made berry parfaits with vanilla yogurt, strawberries, fresh-picked blackberries, and real whipped cream -- with a sprig of mint and some walnuts for garnish. Healthy and delicious!


My father found the perfect gift for our mother, which he graciously allowed us to give to her -- a beautifully framed copy of Peder Kroyer's painting of two women on Skagen Beach. My mother, unbeknownst to me, has loved this painting for many years. I discovered it only recently, as I scoured Art.com in an effort to compile a list of artists and paintings that I like (a list which is now about 17 pages long!).


And just to make the Week in Feminine Dress last one more day (and in honor of Mother's Day), I wore my "Beach dress" from the Sense and Sensibility 1914 Tea Dress pattern.


The fabric is an embroidered cotton voile, which I found a few years ago for $2 per yard at Wal-Mart. This was a project that spent about a year in my UFO (unfinished object) box. Two years ago I finally pulled it out and finished it.


The sash is a beautiful raspberry taffeta ribbon that I found at JoAnn's on clearance (I think it was 12 cents per yard) a few years ago. I used the excess ribbon as a headband.


Happy Mother's Day to all mothers out there! Thank you so much for all that you do!

Thursday, December 20, 2007

Cheddar Potato Soup

On Wednesday I tried a new soup recipe out of Cooking Light's Low-Fat Low-Calorie Quick and Easy Cookbook. Although the title of the book sounds decidedly modern and unromantic, their recipe for Cheddar Potato Soup is a delightful representation of all things creamy and delicious. There was very little of the soup left at the White Elephant gift party we attended on Wednesday, even with a doubled recipe. This is a simple recipe that is perfect for winter.


Ingredients: (which I've altered to make more "fattening," since I abhor the low-fat craze)

32 oz. chicken broth

5 cups shredded potato (I substituted frozen french fries, which I cubed)

1 cup chopped onion

1/2 tsp. salt

1/2 tsp. ground pepper

2 TBSP all-purpose flour

1 (12 oz.) can evaporated milk

1 cup (4 oz.) shredded Cheddar cheese

1/3 cup chopped green onion (for garnish)

Instructions:

1. Combine first 5 ingredients in a Dutch oven: bring to a boil. Reduce heat, and simmer, uncovered, 20 minutes.

2. Combine flour and milk in a small bowl, stirring until smooth. Add to potato mixture. Cook over medium heat, stirring constantly, 5 minutes or until thickened.

3. Pour half of potato mixture into container of an electric blender; cover and process until smooth, stopping once to scrape down sides. [NOTE: the next step is to blend the other half of the potato mixture; however, I chose to leave some of the potato chunks in the soup for some texture -- which is why I chose cubed french fries instead of shredded potato. If you want potato chunks, just add the blended mixture back into your pot. If you want creamy soup, repeat the procedure with remaining half of potato mixture.]

4. Return mixture to Dutch oven. Add cheese; cook over medium heat, stirring unti lcheese melts. Ladle soup into individual bowls; sprinkle each serving evenly with green onion.

Yield: 7 (1 cup) servings.

Enjoy!